

Keeping Windows 11 up to date is essential for security, performance, and access to the latest features. However, updates don’t always install smoothly. In fact, many users find that a Windows update becomes stuck at various percentages for hours without making any visible progress. Additionally, the computer may repeatedly restart or display a message such as “Working on updates” without ever completing the installation.
The good news is that this problem is usually fixable without reinstalling Windows. Whether the issue is caused by a temporary software glitch, corrupted update files, insufficient disk space, or a background service conflict, several proven troubleshooting methods can help get your system back to updating.
In this comprehensive guide, you’ll learn 12 effective solutions to fix a Windows 11 update that is stuck during download or installation. Each method is explained in simple, step-by-step instructions, making it easy to follow even if you’re not an experienced computer user.
Let’s begin with the simplest fixes before moving on to the more advanced solutions.
Table Of Contents :
- Why Windows 11 updates get stuck
- Fix 1: Wait a little longer (sometimes it’s normal)
- Fix 2: Restart your computer
- Fix 3: Check your internet connection
- Fix 4: Free up disk space
- Fix 5: Run the Windows Update Troubleshooter
- Fix 6: Restart Windows Update services
- Fix 7: Clear the SoftwareDistribution folder
- Fix 8: Run SFC and DISM
- Fix 9: Disconnect external devices
- Fix 10: Perform a Clean Boot
- Fix 11: Install the update manually
- Fix 12: Repair Windows with an in-place upgrade
- FAQs
- Final thoughts
Why Does a Windows 11 Update Get Stuck?
Before trying different fixes, it’s helpful to understand why Windows 11 updates sometimes get stuck. An update can pause during the download, installation, or restart phase for several reasons. Identifying the possible cause can make troubleshooting much easier.
Here are the most common reasons:
1. Slow or Unstable Internet Connection
Windows updates require a reliable internet connection to download files from Microsoft’s servers. If your connection is slow or frequently disconnects, the update may appear to freeze at a certain percentage.
2. Corrupted Windows Update Files
Sometimes, files stored in the Windows Update cache become corrupted. When this happens, Windows may fail to verify or install the update correctly, causing the installation process to stop unexpectedly.
3. Insufficient Storage Space
Major Windows updates need several gigabytes of free disk space. If your system drive is nearly full, Windows may not have enough room to complete the installation.
4. Background Software Conflicts
Certain third-party applications, especially antivirus programs, firewall software, or system optimization tools, can interfere with the update process and prevent it from finishing successfully.
5. Damaged System Files
Missing or corrupted Windows system files can interrupt the update process. Fortunately, Windows includes built-in tools that can scan for and repair these files.
6. Hardware or Driver Issues
Outdated or incompatible device drivers may create conflicts during Windows updates. External devices such as USB drives, printers, or docking stations can also interfere with the installation.
7. Temporary Windows Glitches
Not every update problem has a serious cause. Occasionally, Windows encounters a temporary bug or software glitch that can be resolved with a simple restart.
Now that you know the most common causes, let’s start with the easiest fixes before moving on to more advanced troubleshooting methods.
Fix 1: Wait a Little Longer
It may sound obvious, but sometimes the best solution is to simply wait.
Large Windows 11 feature updates can take anywhere from 30 minutes to over an hour, depending on your Computer’s Hardware, Internet speed, and the size of the update. During this time, the progress percentage may remain unchanged for several minutes, making it seem like the update is stuck when it is actually still working in the background.
You should wait if:
- The hard drive or SSD activity light is still blinking.
- You can hear the computer’s cooling fan running normally.
- The update percentage changes occasionally, even if slowly.
- The computer has not displayed an error message.
When should you consider it stuck?
If the update has remained at the same percentage for more than two hours with no disk activity, no progress, and no visible signs of installation, it is reasonable to assume that something has gone wrong. Consequently, you should move on to the next troubleshooting steps in this guide.
Crucially, avoid turning off your PC while Windows is actively installing updates. Doing so may corrupt system files or leave the operating system unstable.
Fix 2: Restart Your Computer
A simple restart can often resolve temporary software glitches that prevent Windows updates from completing.
If your update has been frozen for several hours with no progress, you can safely force a restart and try the update again.
How to restart your PC:
- Press and hold the Power button for about 10 seconds until your computer turns off.
- Wait 20–30 seconds.
- Press the Power button again to start your computer.
- Allow Windows to boot normally.
- Open Settings > Windows Update.
- Click Check for updates and let Windows try the installation again.
In many cases, Windows automatically resumes the update after restarting. If the issue persists, continue with the next solution.
In the next part, we’ll cover Fixes 3 through 6, including checking your internet connection, freeing up disk space, running the Windows Update Troubleshooter, and restarting Windows Update services. These are some of the most effective solutions users can try.
Fix 3: Check Your Internet Connection
A Slow or Unstable Internet Connection can interrupt the download process and make it seem like Windows Update is stuck. This is especially common with large feature updates, which can be several GigaBytes in size.
Here’s what you should do:
- Open your web browser and visit a few websites to confirm that your internet connection is working properly.
- If websites are loading slowly, restart your modem or router.
- If you’re using Wi-Fi, move closer to your router or switch to a wired Ethernet connection for a more stable experience.
- Pause any large downloads or streaming services on other devices connected to your network.
- Once your connection is stable, go to Settings > Windows Update and click Retry or Check for updates.
Pro Tip: If you’re using a VPN, temporarily disconnect it before updating Windows. Some VPN servers can interfere with the download process or slow your connection.
Fix 4: Free Up Disk Space
Windows 11 needs enough free storage to download, unpack, and install updates. If your system drive (usually the C drive) is nearly full, the update may fail or remain stuck.
Check your available storage:
- Open Settings.
- Click System.
- Select Storage.
- Check how much free space is available on your C: drive.
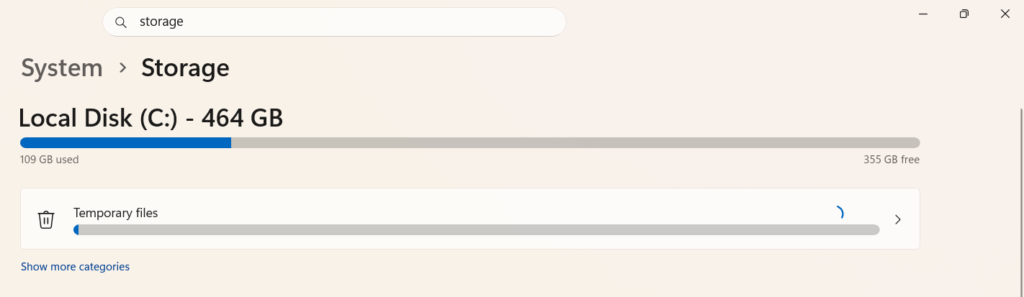
For major Windows updates, it’s recommended to have at least 20 GB of free space.
Ways to free up storage:
- Empty the Recycle Bin.
- Delete temporary files.
- Remove unused applications.
- Move large files such as videos and photos to an external drive or cloud storage.
- Run Windows Disk Cleanup.
Use Storage Sense
Windows 11 includes a built-in feature called Storage Sense, which automatically removes temporary files and helps reclaim storage.
To enable it:
- Open Settings > System > Storage.
- Turn on Storage Sense.
- Run it manually to clean unnecessary files.
After freeing up space, restart your computer and try installing the update again.
Fix 5: Run the Windows Update Troubleshooter
Microsoft includes a built-in troubleshooter that automatically detects and fixes common Windows Update problems.
To Run the Troubleshooter:
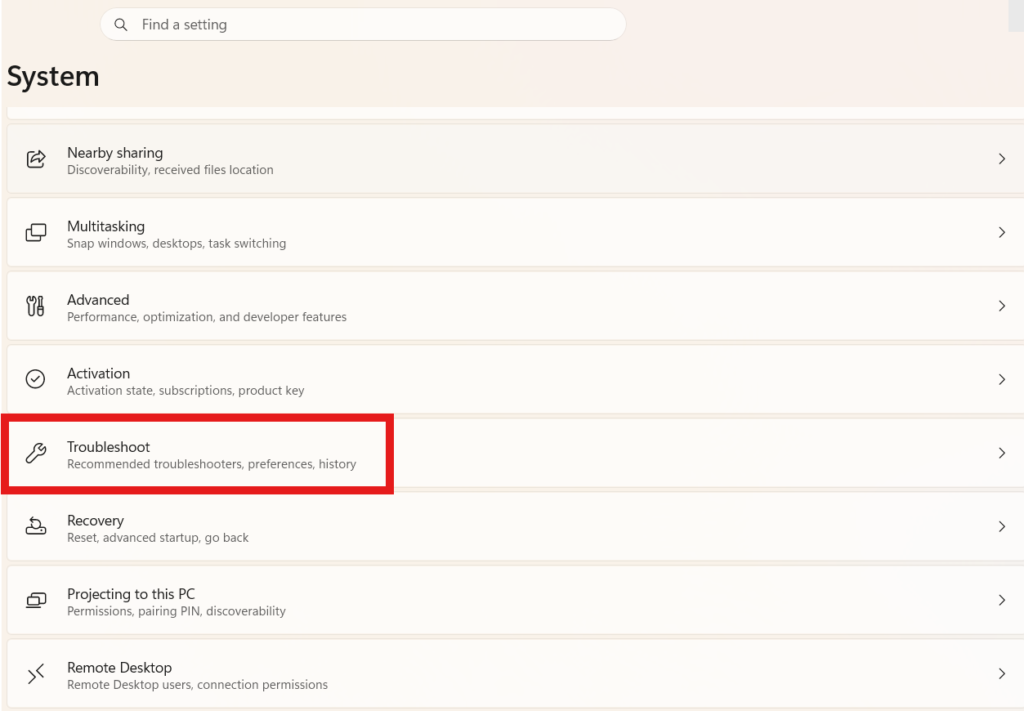
- Open Settings.
- Select System.
- Click Troubleshoot.
- Choose Other Troubleshooters.
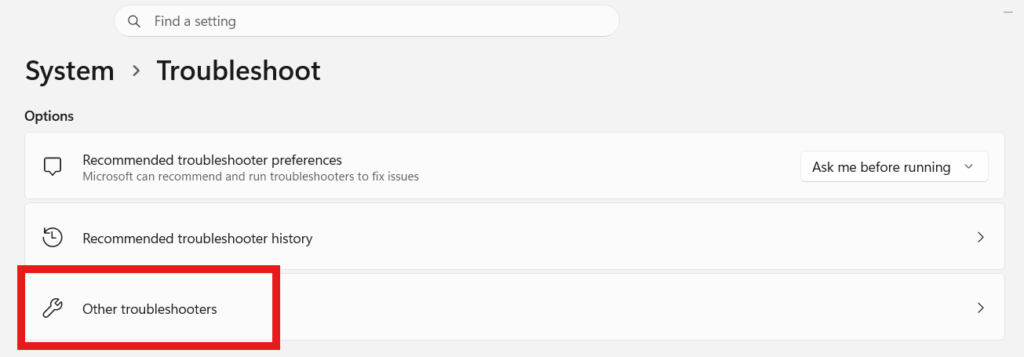
- Find Windows Update.
- Click Run next to it.
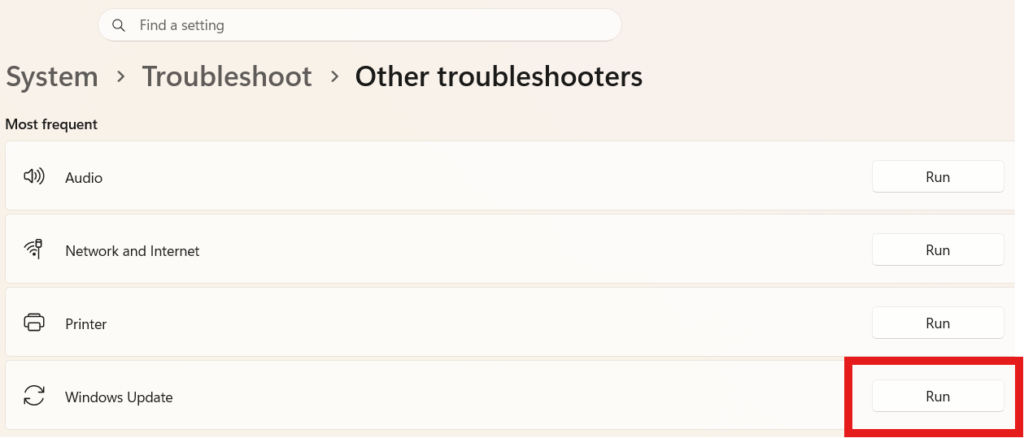
The Troubleshooter will scan your computer for issues such as:
- Corrupted Update Components.
- Incorrect Windows Update settings.
- Missing Services.
- Common Installation Errors.
If Windows finds any problems, follow the on-screen instructions to apply the recommended fixes. After the troubleshooting process is complete, restart your computer and check for updates again.
Fix 6: Restart Windows Update Services
Windows Update relies on several background services. If one of these services stops unexpectedly, updates may freeze or fail to install.
Restarting these services often resolves the issue.
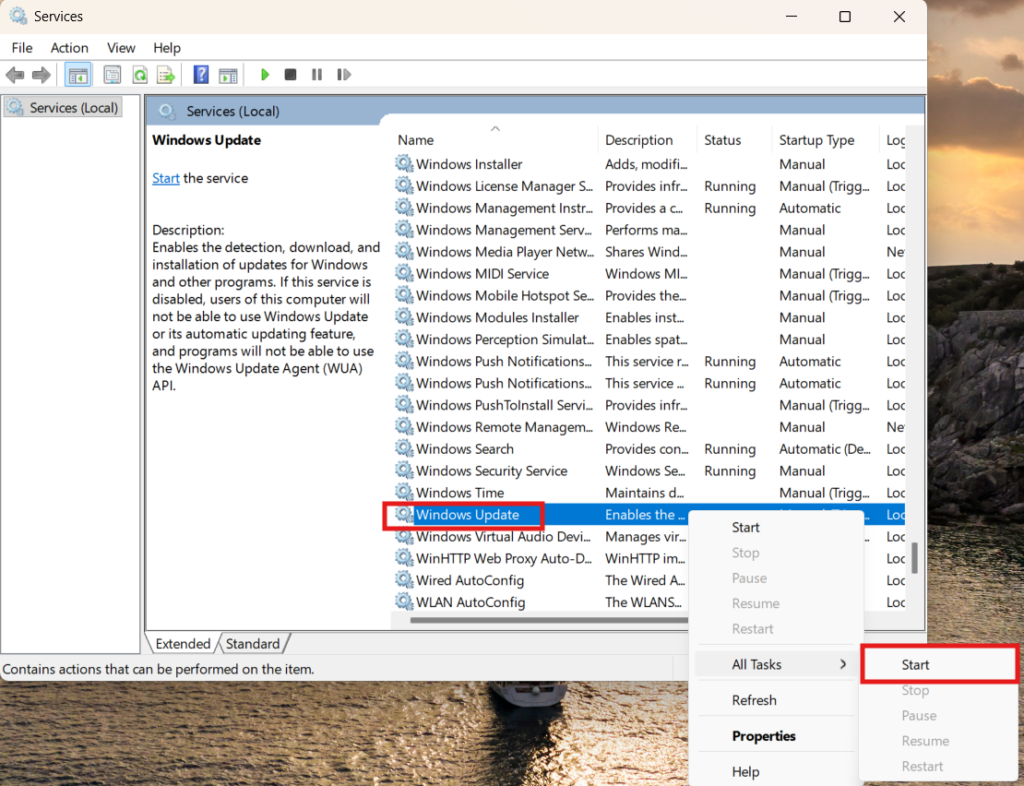
Method 1: Using the Services app
- Press Windows + R.
- Type services.msc and press Enter.
- Locate the following services:
- Windows Update
- Background Intelligent Transfer Service (BITS)
- Cryptographic Services
- Right-click each service and select Restart.
- If a service isn’t running, choose Start instead.
Method 2: Restart services using Command Prompt
- Search for Command Prompt.
- Right-click it and select Run as administrator.
- Enter the following commands one by one:
net stop wuauserv
net stop bits
net stop cryptsvc
net start cryptsvc
net start bits
net start wuauserv
After restarting these services, close Command Prompt, restart your computer, and try installing the update again.
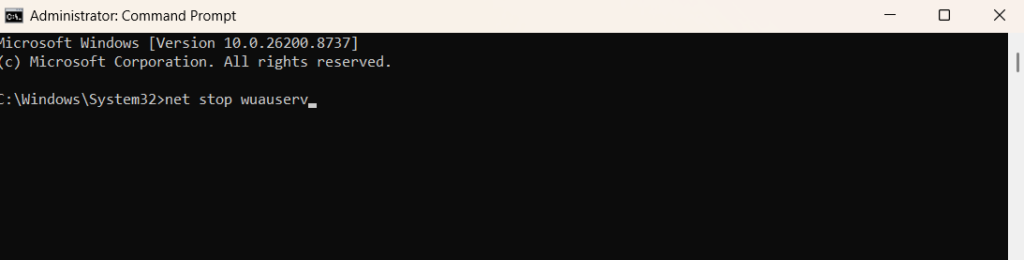
Why this works: Restarting Windows Update services clears temporary service errors, refreshes update components, and allows Windows to communicate with Microsoft’s update servers properly.
How to Check Laptop Battery Health in Windows 11 (Complete Guide)
Next, we’ll cover Fix 7 to Fix 10, including clearing the SoftwareDistribution folder, running SFC and DISM scans, disconnecting external devices, and performing a Clean Boot—some of the most effective fixes for persistent update issues.
Fix 7: Clear the SoftwareDistribution Folder
Windows stores downloaded Update Files in a folder called SoftwareDistribution. If these files become corrupted or incomplete, Windows Update may get stuck at 0%, 50%, 100%, or fail to install altogether.
Deleting the contents of this folder forces Windows to download a fresh copy of the update.
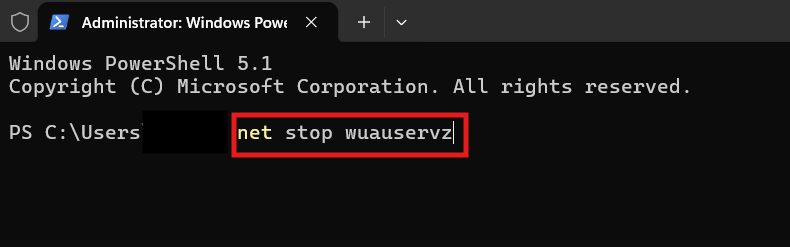
Step 1: Stop Windows Update Services
- Press Windows + X and select Terminal (Admin) or Command Prompt (Admin).
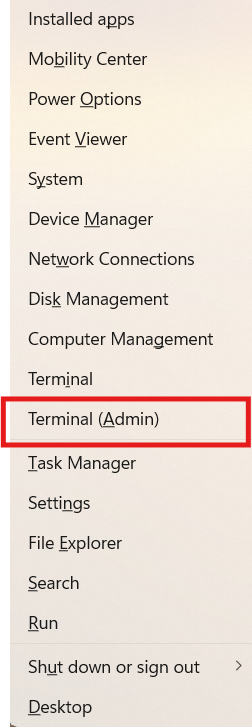
- Type the following commands one at a time and press Enter after each:
net stop wuauserv
net stop bits
Step 2: Delete the Update Cache
- Open File Explorer.
- Navigate to:
C:\Windows\SoftwareDistribution
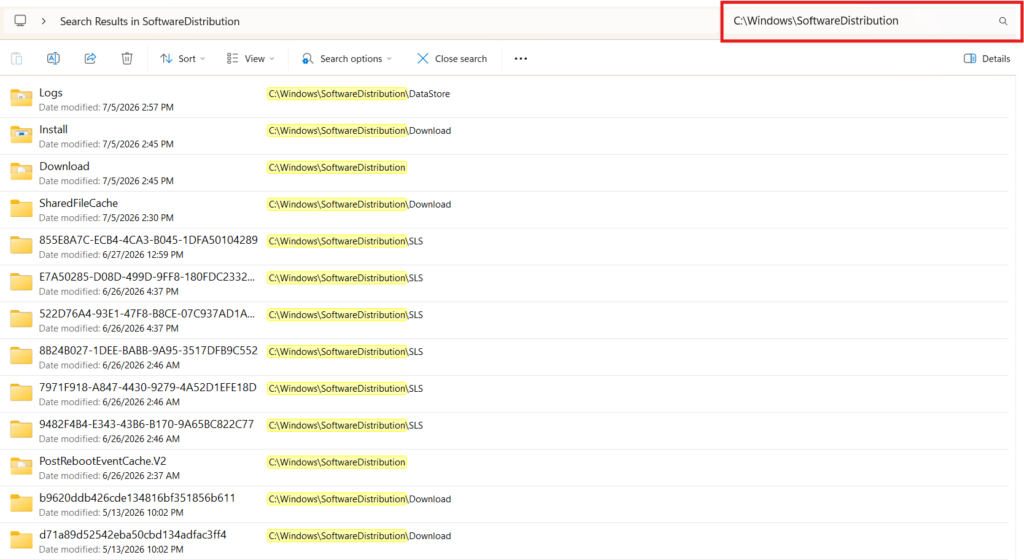
- Select all files and folders inside the SoftwareDistribution folder.
- Press Delete.
Note: Do not delete the SoftwareDistribution folder itself—only its contents.
Step 3: Restart the Services
Return to the administrator Command Prompt and run:
net start wuauserv
net start bits
Restart your computer and check for updates again. Windows will automatically download fresh update files.
Fix 8: Repair Corrupted System Files Using SFC and DISM
Corrupted Windows system files are one of the most common reasons updates fail. Fortunately, Windows includes two powerful built-in tools to repair them.
Run the System File Checker (SFC)
- Search for Command Prompt.
- Right-click it and choose Run as administrator.
- Type the following command:
sfc /scannow
- Press Enter.
- Wait until the scan reaches 100%.
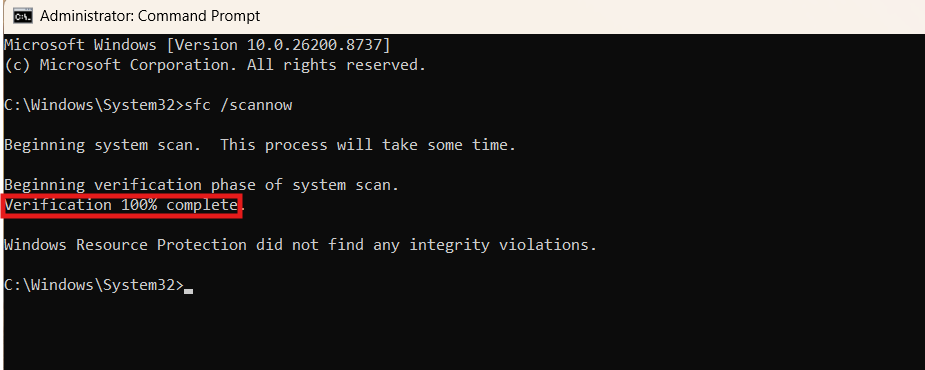
If SFC finds corrupted files, it will automatically repair them.
Run the DISM Tool
After the SFC scan finishes, run the following command:
DISM /Online /Cleanup-Image /RestoreHealth
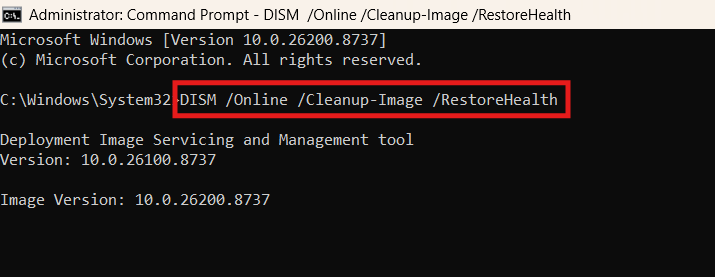
This scan may take 10–30 minutes depending on your system.
Once both scans are complete:
- Restart your computer.
- Open Settings > Windows Update.
- Click Check for updates.
Many update-related issues are resolved after repairing damaged system files.
Fix 9: Disconnect External Devices
External hardware can sometimes interfere with Windows updates by loading incompatible or outdated drivers during installation.
Before updating, disconnect any unnecessary devices, including:
- USB flash drives
- External hard drives
- Printers
- Scanners
- Webcams
- Gaming controllers
- USB hubs
- SD cards
- Docking stations
Leave only the following connected devices:
- Keyboard
- Mouse
- Monitor
Restart your computer after disconnecting the devices and try installing the update again.
If the update completes successfully, reconnect your devices one at a time and install any available driver updates.
Fix 10: Perform a Clean Boot
Sometimes, third-party software starts automatically with Windows and prevents updates from installing correctly.
A Clean Boot starts Windows with only essential Microsoft services, helping you identify software conflicts.
How to Perform a Clean Boot
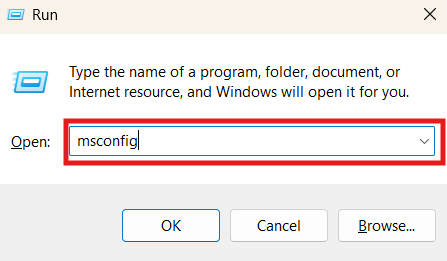
- Press Windows + R.
- Type msconfig and press Enter.
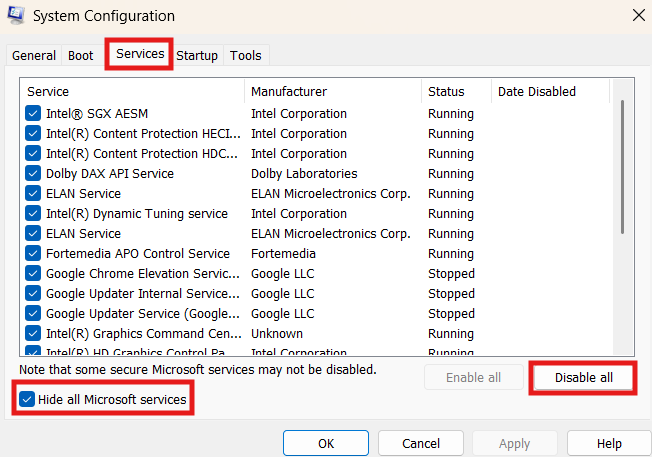
- Open the Services tab.
- Check Hide all Microsoft services.
- Click Disable all.
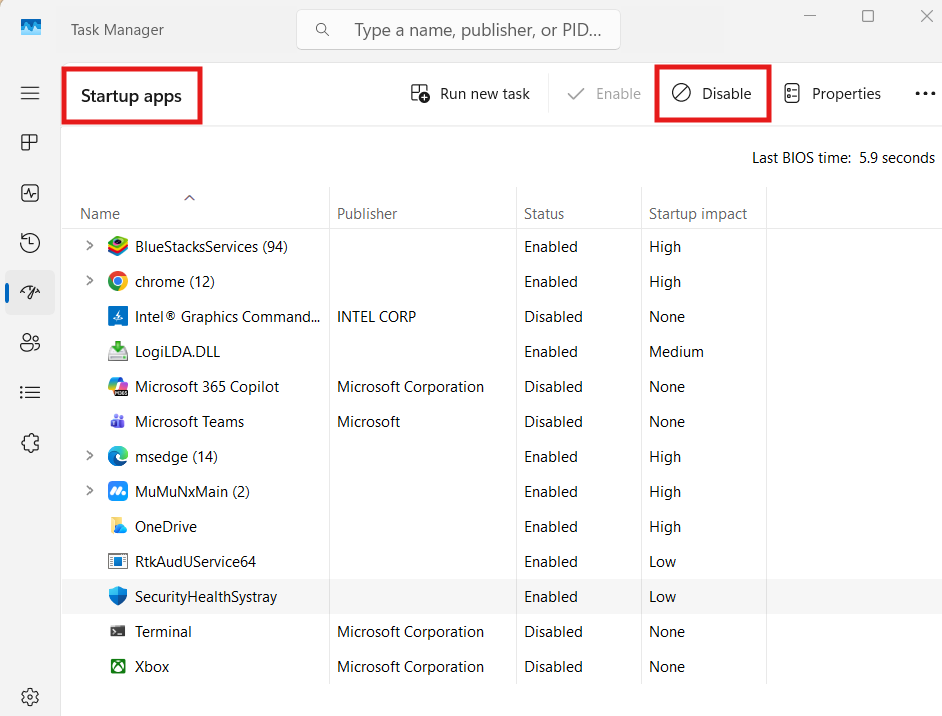
- Go to the Startup tab.
- Click Open Task Manager.
- Disable all startup applications.
- Close Task Manager.
- Click Apply, then OK.
- Restart your computer.
After Windows starts, try installing the update again.
Important
Once the update installs successfully, open msconfig again and re-enable your normal startup services so your applications function as expected.
A Clean Boot is especially useful if antivirus software, optimization tools, RGB software, or other background applications are interfering with Windows Update.
Now, in the final part, we will cover:
- Fix 11: Install the update manually using the Microsoft Update Catalog.
- Fix 12: Repair Windows with an in-place upgrade.
- Frequently Asked Questions (FAQs).
- Conclusion.
Fix 11: Install the Update Manually
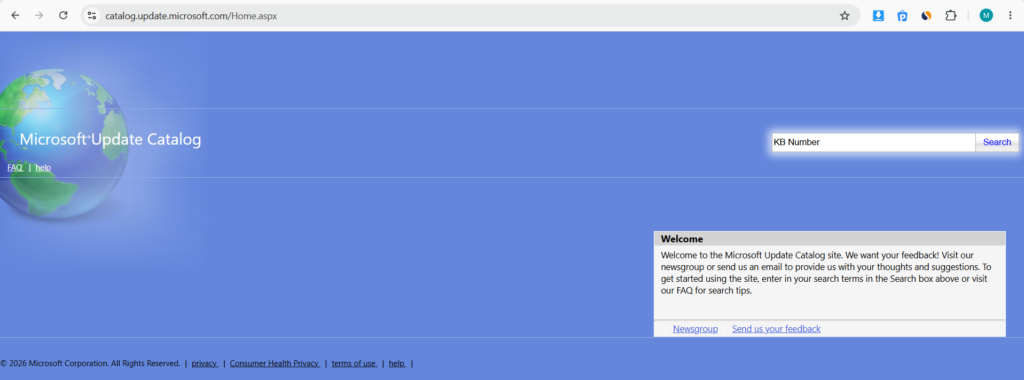
If Windows Update still refuses to install the update, you can download and install it manually. Microsoft provides standalone update packages through the Microsoft Update Catalog.
Step 1: Find the Update Number
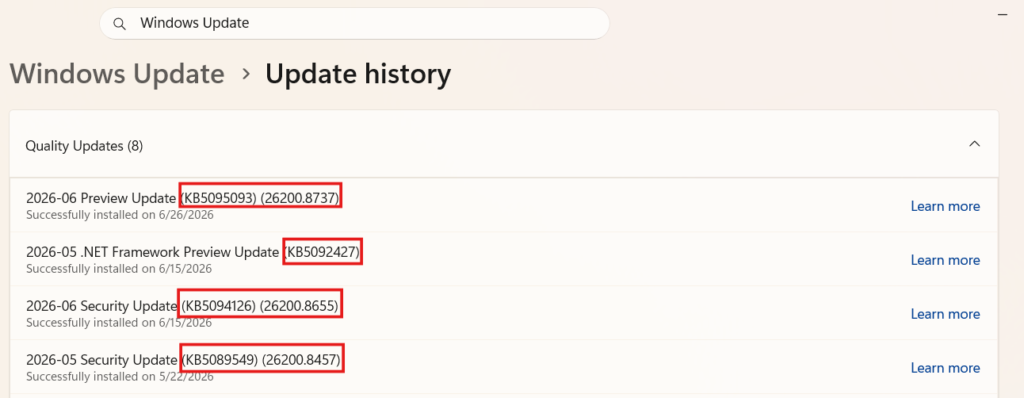
- Open Settings > Windows Update.
- Note the update’s KB number (for example, KB5060842).
Step 2: Download the Update
- Visit the Microsoft Update Catalog website.
- Search for the KB number.
- Download the version that matches your system (usually Windows 11 x64-based Systems).
Step 3: Install the Update
- Double-click the downloaded file.
- Follow the on-screen instructions.
- Restart your computer if prompted.
Installing the update manually often bypasses issues with the Windows Update Service and can resolve persistent installation problems.
Fix 12: Perform an In-Place Upgrade Repair
If none of the previous solutions work, an In-Place Upgrade Repair is one of the most effective ways to fix Windows Update issues without deleting your personal files or installed applications.
This process involves reinstalling Windows 11 while keeping your:
- Personal files
- Installed programs
- User accounts
- Most settings
Before You Begin
- Back up important files as a precaution.
- Ensure you have a stable internet connection.
- Keep your Laptop plugged into a power source throughout the process.
How to Perform an In-Place Upgrade
- Visit Microsoft’s Official Windows 11 Download page.
- Download the Windows 11 Installation Assistant or the latest Windows 11 ISO.
- Launch the installer.
- Select Keep personal files and apps when prompted.
- Follow the installation wizard.
- Wait for the repair process to complete.
After the installation finishes, open Settings > Windows Update and check for any remaining updates.
For official Windows support, visit: Microsoft Windows Help
This is especially useful if the update is known to be problematic. Microsoft recently pulled and replaced several faulty updates.
For more troubleshooting guides, visit Techmart. Study our policies on the Contact Us and About Us pages on our website.
Frequently Asked Questions (FAQs)
Why is my Windows 11 update stuck at 100%?
Even after reaching 100%, Windows may still be configuring files and installing system components in the background. If there is no progress for more than two hours, try the troubleshooting methods in this guide.
Can I turn off my computer while Windows is updating?
It’s best not to. Interrupting an update may corrupt system files or cause Windows to fail during startup. Only force a shutdown if the update has clearly frozen for an extended period and shows no signs of activity.
How long should a Windows 11 update take?
Most updates finish within 15 to 60 minutes, while major feature updates can take one to two hours, depending on your computer’s hardware and internet speed.
Will I lose my files if I repair Windows 11?
No. If you perform an In-Place Upgrade Repair and choose Keep personal files and apps, your documents, installed software, and user accounts will remain intact.
Why does Windows Update keep failing?
Common causes include:
- Corrupted update files
- Damaged system files
- Insufficient storage space
- Internet connectivity issues
- Outdated drivers
- Conflicting third-party software
Working through the fixes in this guide usually resolves the problem.
Final Thoughts
A Windows 11 update getting stuck at 0%, 50%, or 100% can be frustrating, but it doesn’t usually mean your computer has a serious problem. In many cases, the issue can be resolved with simple steps like checking your internet connection, freeing up storage, or running the Windows Update Troubleshooter.
If the problem continues, advanced methods such as clearing the SoftwareDistribution folder, repairing system files with SFC and DISM, or performing an In-Place Upgrade Repair can often restore the update process without requiring a full reinstall of Windows.
We recommend starting with the basic fixes first and progressing to the more advanced solutions only if necessary. Following this approach minimizes the risk of unnecessary changes while giving you the best chance of completing the update.
If one of these solutions worked for you, let us know in the comments. If you’re still experiencing issues, describe the problem and any error codes you’re seeing—we’ll do our best to help.